

1. Upload each photo - one at a time- to be included into the online photo processor
2. Choose the view (1 -4) that you prefer
3. Use the Windows 'Snipping Tool' to copy the photo
4. Save each photo in a folder for future use.
*If you have photo editing software with the appropriate features (Photoshop for example) you may also go here for instructions for creating your photos/coloring pages.
Here's an actual before and after of one of my photos:


Materials List:
- Computer/copier paper
- 1 - foam sheet or other material for creating your front and back covers
- Single hole punch
- Hole reinforcements (I used clear)
- Decorative stickers or other embellishments for the front of your coloring book
- Sharpie permanent marker for the dedication on the back cover
- 1 - 1" binder ring (I used nickel plated) to assemble coloring book yet allow the child to easily access individual pictures for coloring or painting.
Now you are ready to create the pages and assemble your coloring book:
- Using MS Word or another word processing program, place two photos on each page using portrait orientation. NOTE: one photo (the bottom) will be upside-down at this stage
- Print out all of your pages
- Fold each page in half
- Using a hole punch, punch one hole at the top left corner of each page making sure all holes line up from page to page.
- Stick hole reinforcer around holes - this keeps pages from being pulled out of your album by the paper tearing
- Cut 8 1/2 x 11 foam sheet (or other cover material) in half and punch holes in both pieces at the top left, making sure they line up with your pages
- Using your binder ring assemble the photo coloring book in the preferred order
- Decorate both the front and the back to further personalize your gift.
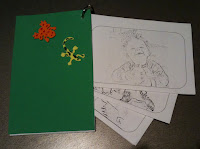
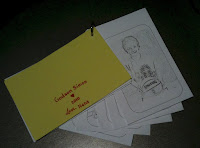
The finished product can be seen below (l-front view, r-back view with personalized message), as well as one of my God-children after coloring a page showing him in his school basketball photo (center). Enjoy!

No comments:
Post a Comment
Thank you for your feedback...I love to know what is on your mind! My comment section is set for moderation and your post will be visible shortly!